Having the right tool makes all the difference. No matter what job you plan, the
first question is do I have the knowledge and experience to handle it myself, or
even with the help of friends? The second, do I have the tools? If the answer is
yes, you are good to go.
Some people think tools are expensive, and when I look at my tool boxes and
realize how much money it would cost to replace them, I agree. I have been
adding to those tool boxes for many years, so it was never a lot of money at one
time. Yes I made payments on some items just because I did not have enough money
to buy them outright. I’ve even borrowed a tool or two from time to time. My
rule is if I need it more than twice, I need to own it. All the tools I own have
paid for themselves many times over.
We are now in a
generation where motorcycle tools are no longer just box-open wrenches and
sockets.
Specialty continue to increase and now include electronic devices such as meters
and scanners. I recently came across a handy dandy item named the Twin Scan 88
from Daytona Twin Tec.
Part of doing any repair is the ability to figure out what the problem is. Some
are obvious, like parts falling off or oil leaks, and others are just a light
coming on and basically saying, “HEY DUDE, one of My Parts Isn’t Working Right.”
That little light we all like to call an idiot light. Yeah, so now what do you
do?
It may be something you could fix yourself, if you knew what the light referred
to. If you do not have a way to read the codes you’re forced to haul it to a
shop. If nothing else they are going to charge you to tell you what’s wrong with
it. Most shops frown on doing that if it does not include them doing the
repairs.
Well, the Twin Scan 88 made by Daytona Twin Tec LLC may be the answer to many
repair issues. The tool is very reasonably priced and easy to use.
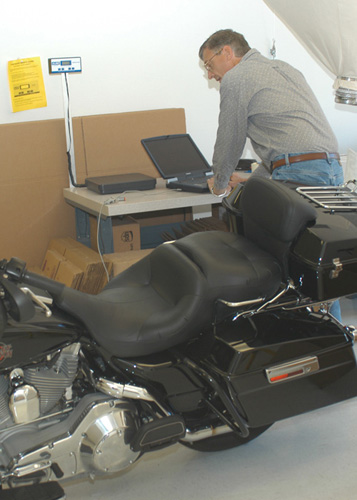
Chris Schroeder, the
engineer behind the tool, checking my laptop.
To make the scan tool work you will need a laptop PC with Pentium processor and
super VGA display (SVGA with 1024x768 pixel resolution) running Windows
98/ME/XP. A high speed Pentium processor is highly recommended as processors
slower than 300 MHz will exhibit a sluggish program. The PC must have a CDROM
drive program loading and a free serial port (COM1-4) with a standard 9 pin male
D-sub connector.
You will also need a 9-pin male to female connector cable such as a Belkin
F2N209-06-T or Office Depot P/N 825851. These are available at most computer
supply stores.
YEA I KNOW, I don’t know what all that means either but my son does, and he has
had me hooked up for awhile. If you do not understand the above, show it to a
computer person and ask them to explain. The answer will likely be that X costs
amount of money.
If you already own a lap top and it meets the requirements simply insert the CD
that comes with the Twin Scan 88 and down load the program following the easy
instructions.
If you do not have a lap top there are numerous options. Depending how you plan
to use the tool will be a consideration. If it’s for personal use and maybe
helping out a friend now and then it is one thing, but if you are a shop and
numerous people will be using it would be another.
The Twin Scan is designed to work on Harley-Davidson motorcycles with the SAE
J1850 data bus that allows the engine control module (ECM), instrument module
(IM), turn signal/ security module (TSM/TSMM) and diagnostic scan tools to
communicate with each other.
That breaks down to
2001-2005 fuel injected models using the Delphi fuel injection system and
2003-2005 carbureted models with the new 12 pin ignition module.
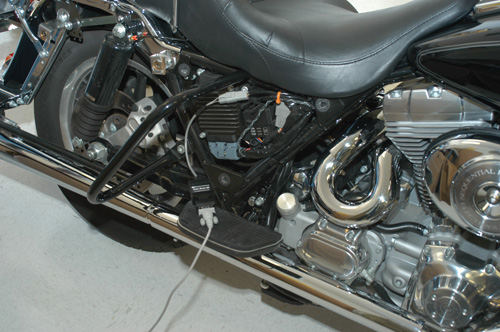
One end of the Twin Scan 88 hooks to the 4 terminal Deutsch style data link
connected to the Harley-Davidson wiring harness and the other end plugs into
your lap top. It allows you to read and clear diagnostic trouble codes from the
ECM, TSM/TSMM, speedometer, and tachometer (on models with IM data bus), and you
can view real time data on an instrument panel type display.
The scanner gets power from the data link connector whenever the ignition is
turned on and it will only communicate with the laptop when ignition is on.
The engine does not have to be running to read and clear diagnostic codes. When
you have your computer powered up click on the read codes button and information
from all available modules will display. The upper half of the screen will
display the system ID and calibration codes while the lower half will show
diagnostic trouble codes, current and historic codes along with a brief
descriptions.
The codes are the same as those listed in the Harley- Davidson Electrical
Diagnostic manual. They are also available from many motorcycle web sites. Hey
if you can’t find them anywhere else let me know and I will send them to you. If
it turns out to be a real popular request I am sure the magazine will do some
thing on them.
You can print any of the displayed information by simply clicking on the Print
Codes button. This can be saved for your records or to show to a customer. When
you are finished you can clear any codes by just clicking on the Clear Codes
button.
To use the Real Time Data Display start with setting for carburetor OR fuel
injection system. When you start your engine you can watch the data on
instrument panel layout. It has a round Tachometer and Speedometer and bar graph
gauges for most other information.
You will be able to read RPM, Battery Voltage, Manifold Pressure, Throttle
Position, Front and Rear Cylinder Ignition Advance, Front and Rear Fuel
Injection Pulse, Front and Rear Knock Retard, Air-Fuel Ratio, Idle Air Control,
Engine Cylinder Head Temperature, Intake Air Temperature, Barometric Pressure,
and Idle Speed.
On the upper right of the screen you can also see info on if engine is running,
if the theft deterrent system is working, if vehicle tipped (excessive bank
angle) and if a diagnostic trouble code has been set.
This will also make
some other tools unnecessary making the price of this unit even more attractive.
It will give you plenty of information to figure out how well the motorcycle is
operating. It will also help generate work for your shop and help insure that
the owner does not get stuck on the side of the road. If you are checking
because someone did have a breakdown, it will speed your repair time.
The unit can also be used as a stand alone data logging device (not hooked to a
computer). It provides capabilities not found in any other available tools. You
can install the tool and ride the motorcycle with it in place. Under normal
conditions (no trouble codes) the unit will store information for the last hour
of operation. If a trouble code is set the unit automatically stops logging data
30 minutes after the code is set. You can down load the data later. This is
ideal for finding intermittent codes that show up while you are riding. It can
eliminate the need for expensive dyno time.
How did I find out about this? Well it went some thing like this. E-mail from
Keith R. Ball, “How far away from Daytona Beach are you?”
”Hundred miles, WHY?
”Do you still have your 2004 Harley?”
” Yes, WHY?”
”We have an assignment from Daytona Twin Tec, and you have the motorcycle.”
After many years of knowing this guy, I learned to be careful how I answered his
questions. Some assignments involved sharks, but this one wasn’t bad. I rode to
South Daytona and meet Allen Alvarez and Chris Schroeder of Daytona Sensors.
Chris showed me around the shop and some of the units they were assembling. He
went over, in detail, how the Twin Scan 88 worked and we installed the program
on my lap top. He installed while I pulled my bike in their facility and removed
the right saddle bag and the side cover. We connected the scan tool to the data
link and started the engine. The real time engine display on the laptop showed.
There was a multitude of information, and if there had been a problem it would
have popped up. We went through the various features, and I was impressed.
We then cleared all the codes and left the scan tool connected for a road test.
When I returned, we plugged the computer back in and down loaded the
information, it showed me going through the gears, rpm, throttle position, fuel
ratio and a host of other information.
What I did find out was that my fuel to air ratio was perfect. Though that is
good for gas mileage it is not necessarily right for making power. I’ll work on
that in the near future. Another story is brewing.
The Twin Scan 88 found a home in my tool box and I am sure it is going to get a
lot of use. I already have friends wanting to stop by and have me hook it up to
their bike, just so they can see how it works.
You can bet they are going to call me
if they have problems, before bringing it to a shop. I can see this thing paying
for itself already. To find out more about the Twin Scan 88 or to get one for
your tool box you can go to Daytona Twin Tec LLC web site at
www.daytona-sensors.com,
phone them at (386) 304-0700 or visit them at 933 Belville Road, Suite 101-1,
South Daytona, Florida, 32119
--ROGUE